
Is the SpinOlution Chair a good height for petite spinners?
in F.A.Q.
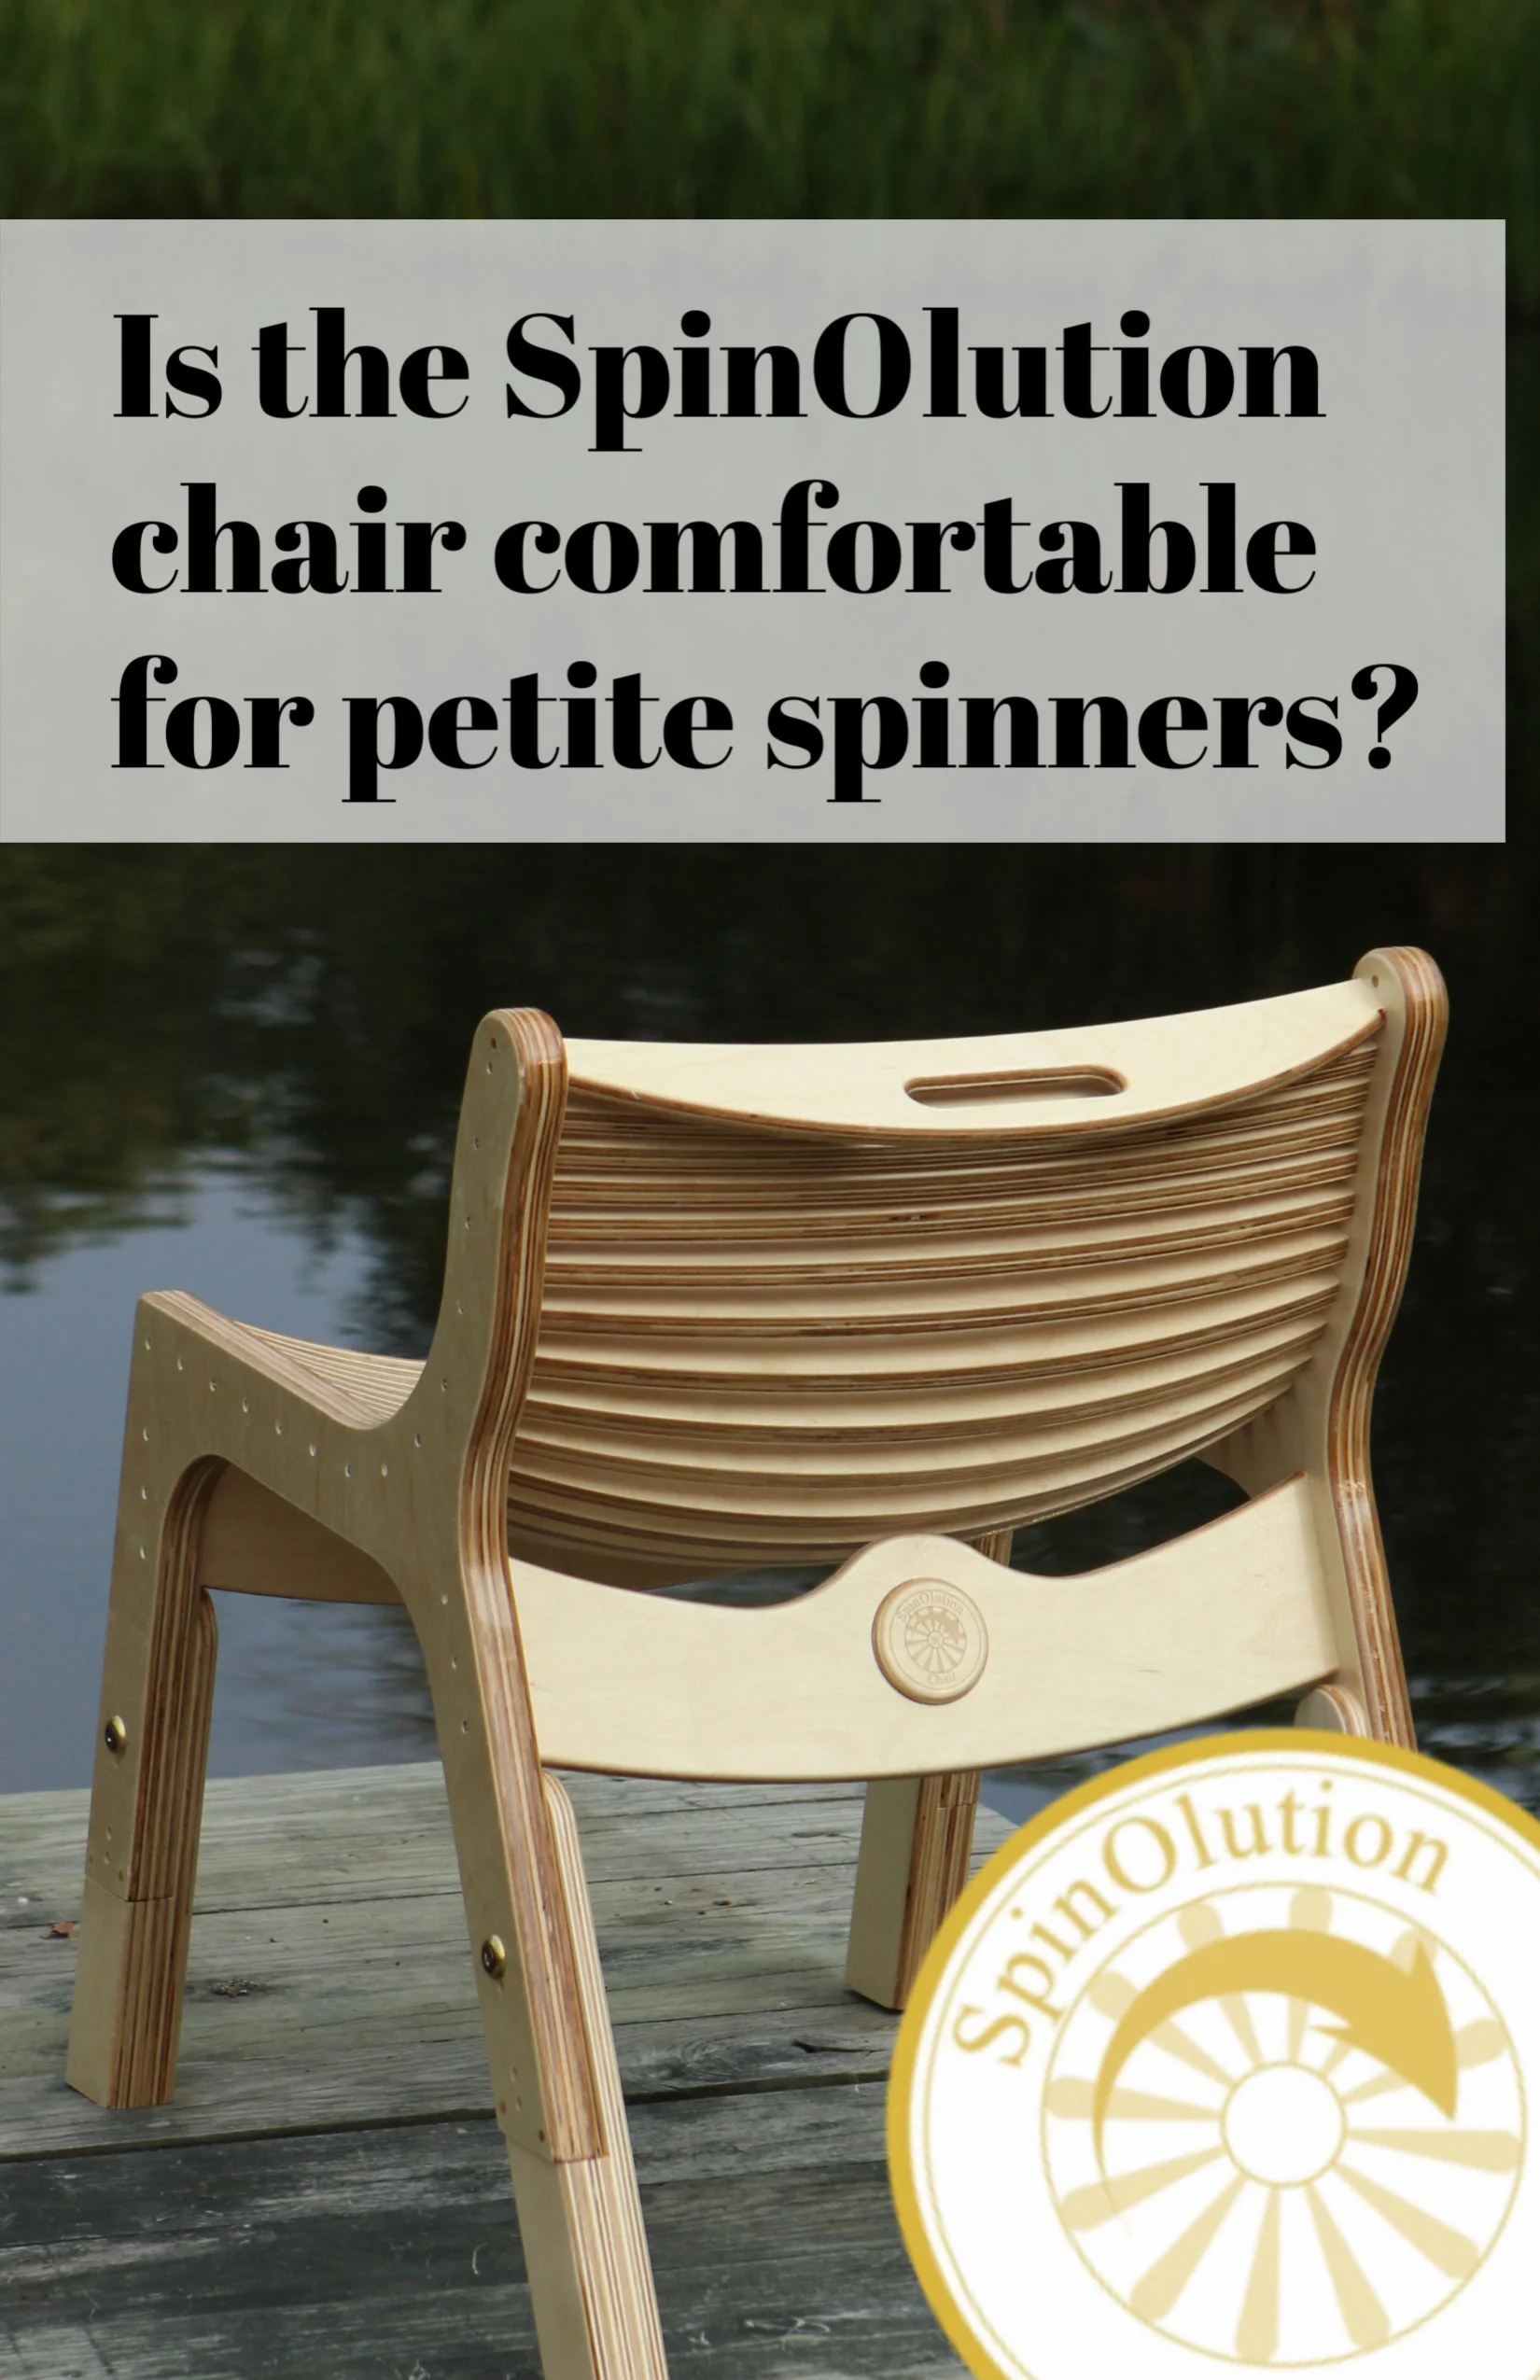
DIMENSIONS
15" width (between side rails)
11" Front to back (before the curve begins)
14.5” Lowest height (at the lowest curve point in front)
17” Highest height (at the lowest curve point in front)
Reviews:
“I am five 2 and I can honestly tell you it is very, very comfortable.”
“ I’m not quite 5’2” and found the chair to be very comfortable.”

My bobbin is rattling and I'm not getting tension, what is wrong with my wheel?
in F.A.Q.

How to prevent a Bee treadle from rubbing on the wheel
in F.A.Q.
Most Likely Scenario: Make sure the left wheel is all the way back (there are washers to keep the wheel out) if there are not enough washers we can ship more to be added for a better alignment. Each wheel has a unique set of washers based on it's alignment in our shop. Sometimes alignment can be jarred during shipping and more washers may be needed to adjust the wheel.
To resolve, send us a picture of the issue to help@spinolution.com so we can troubleshoot and send the appropriate parts for repair. This is a very simple fix.

How to prevent a Pollywog treadle from rubbing on the wheel
in F.A.Q.
Look under the logo and you will find a small hole in the base
Loosen the screw on the base in the back with a small allen wrench (3/32) which will allow the shaft to move freely back and forth.
Push the shaft back
Tighten the screw with the allen wrench
Happy Spinning!
Why did this happen? This most likely happened during shipping and will not be a problem once the shaft is pushed back into place and tightened with the set screw.
How do I balance a wobbly MACH II 2 Drive Wheel?
in F.A.Q.
The Wheel Wobble on the MACH 2 is due to the wheel shaft moving. Here is how to add a set screw to hold the shaft and keep the wheel from wobbling.
Purchase a wood screw at your local hardware
Use a small drill about 1/8" and drill a pilot hole about 1 1/2 " above the wheel shaft on the back (drill at an angle: that will hit the shaft at the halfway point about 1/2" in)
Screw in a #8 screw about 1 3/4 inch long - this will hit the shaft and lock it from moving. This will remove most of the wheel wobble.
How do I balance a wobbily Bee Drive Wheel
in F.A.Q.
Remove/Replace Bee Drive Wheel
To replace the drive wheel on a Bee, King Bee, or Queen Bee:
Loosen the brass screw behind the wheel
Open the treadle
Push the shaft forward until the wheel is free
Several washers will fall out - keep these to put on with the new wheel as well as the wire ring.
Put the shaft into the new wheel
Add the wire ring to the shaft (next to the new wheel)
Then add the washers
Slide the wheel down into place
Push the shaft into the base
Tighten the bass screw to secure
Reinstall the Drive Band
How do I remove a drive wheel from my Echo?
in F.A.Q.
You may need to remove the main (drive) wheel from your MACH or Echo for troubleshooting or repair.
The Wheel Wobble on the MACH 2 is due to the wheel shaft moving. Here is how to add a set screw to hold the shaft and keep the wheel from wobbling.
Purchase a wood screw at your local hardware
Use a small drill about 1/8" and drill a pilot hole about 1 1/2 " above the wheel shaft on the back (drill at an angle: that will hit the shaft at the halfway point about 1/2" in)
Screw in a #8 screw about 1 3/4 inch long - this will hit the shaft and lock it from moving. This will remove most of the wheel wobble.
Should my flyer be able to move back and forth?
in F.A.Q.
YES There is no problem with the flyer moving front to back. We want some movement so the bearings do not bind. If you are concerned with the amount of movement your flyer has, please send us photos of video of the movement to help@spinolution.com so we can confirm it is within normal range.
If it moves too much, we will send you free washers to limit the range of movement. You might need to pay shipping.

How do I straighten a crooked flyer rod?
in F.A.Q.
Straightening a 1/4" Flyer Rod
Remove the orifice bar and bobbin
Turn the flyer rod by have until the rod is at the highest point
Pull the front tip down until it is true
Continue steps 2 & 3 until the rod is fairly true.
If the flyer still isn't turning true
Loosen the 4 screws on the back ring of the flyer
Adjust the flyer to turn true
Tighten the screws
How do I balance a Pollywog Drive Wheel?
in F.A.Q.
You may need to remove the main (drive) wheel from your Pollywog for troubleshooting or repair.

I can't remember how to install my tension block, does the screw go up or down?
in F.A.Q.

Bobbin or Uptake Issues? Check your Flyer Magnet!
If your wheel suddenly seems to not be spinning at it’s best the first place you may want to investigate is the bobbin/ flyer area. By diagnosing the problem yourself you can either fix the problem or have an easier time explaining your issues to our customer help department. Either way we aim to get you back to happily spinning.
At first glance it may be hard to tell if you’re having a problem with your bobbin or the flyer head since the two work so closely together.
First step would be check for the most common problem which luckily is also the most easily fixed. Due to the strength of the magnets which are used on our flyer rods to secure the bobbin, occasionally they may get stuck in the back of your bobbin and come off when you remove it without you noticing. Then if you replace that bobbin with the magnet stuck inside with a different bobbin there will be no magnet to hold it in place for secure spinning. If this is the problem you can easily take a pare of needle nose plies and pull the magnet out of the bobbin away from the metal ring in the middle and then simply re-glue the magnet to the flyer rod. We have a video with further explanation.
If your magnet is still attached to the flyer rod properly but the bobbin is not getting a secure connection to the flyer head, it may be that you need to replace your magnet with a new one. You can purchase replacement magnets from our parts shop here. Having extra magnets and bands is always a safe bet to keep in your spinning parts box.
If your bobbin seems to be locking into place with a strong click and the magnet is attached to the flyer rod and you’re still having uptake issues it may be time to investigate your flyer head.
If the yarn is not being wrapped onto the bobbin and is becoming overly twisted around the orifice you may need to adjust the tension block so that there is a stronger uptake. If you have increased the tension and it’s still not pulling in correctly then you may need to replace the felt on the tension block as seen in this video.
However if there seems to be damage to your flyer head or a mechanical problem please take a picture or video and email it to help@spinolution.com

Troubleshooting Tips
Yarn is not taking up on the bobbin
● Increase the tension by 1⁄4 turns clockwise until yarn takes up.
● Make sure the bobbin is locked into the magnet at the back of the flyer.
● Make sure the orifice bar is locked to the magnets on the flyer bars.
● As the bobbin fills, you will find draw-in decreases – this is standard behavior in scotch tension wheels; increase the brake tension and continue filling your bobbin.
● Check if your yarn has jumped off the pegs, it could wrap around the flyer spindle between the bobbin and orifice arm. Remove the orifice arm, unwrap this yarn, and then restart spinning.
● Check if your fiber is wrapped around the hook or pegs.
Adjusting Each Wheel for your Spinning Needs by Erin James
in F.A.Q.
Just as there are many different shapes and sizes of people with varying strengths and weaknesses, SpinOlution wheels come in a myriad of options. Finding the perfect wheel ( or wheels) for your body and desired yarn is half the fun. Our wheels gears range from straightforward ( the pollywog base model) to more complex ( the Bee family). Before deciding on your preference let’s first revisit why gears and ratios matter.
Gears- The number of band settings you can adjust on your spinning wheel
Ratios- The term to describe the amount of times the flyer head spins completely around in relationship to the drive wheel.
Why this matters- Depending on your personal spinning style, how quickly or slowly you tend to treadle your feet or hold onto the fiber you may need to adjust these gears and ratios to achieve your desired outcome in your yarn.
After familiarizing yourself with the different settings on your wheel and experimenting, you will probably find a handful of settings that will become your go to settings for when you wish to spin different types of yarn
General Guideline
For thinner yarns or finer fibers you may require more twist as you are spinning. It may be helpful to move your gears to a smaller setting meaning more rotations of the flyer head per pump of your feet.
For thicker yarns you may need less twist in your yarn to achieve the bulky or chunky look you are after. Try moving your gears to a larger setting so that there is less build up of twist.
There are also considerations of your body and spinning style. If you default to faster or slower treadling with your feet, changing your gear setting to off set this motion may also help you. Think of this as matching your wheel’s performance
Ordering replacement parts for your SpinOlution Spinning Wheel
in F.A.Q.

During the life of your wheel you may need to order some small replacement parts to keep it in the best possible working order. While our wheels are sold through dealers we offer many of the small spare parts you may need on our main spinolution site for you to purchase at your convenience .
Available spare parts for purchase
Drive band,
Flyer peg pack
Head base attachment kit
Complete tension kit
Magnet pack
Tension block
Tension block felt pack
Bobbin bushing pack
Skein winder
Lazy kate rod
Firefly parts
Firefly fuse pack
If you need a replacement part that is not listed above as available in the replacement parts shop please contact your local or favorite dealer on our dealer map.
Where to shop for a pre-owned SpinOlution Spinning Wheel
in F.A.Q.

What to look for with a used wheel
How old is it? (SpinOlution maintains all generations of their wheels)
How well was it maintained?
How much was it used?
How many accessories does it come with?
Does it include shipping or local pickup only?
SpinOlution also offers a Wheel Tune up Service which is highly recommended to get your used wheel spinning like new.
If you are in the market for a pre-owned SpinOlution wheel there are a few tips and guidelines you may want to consider. The Spinolution Facebook group is an excellent place to start. The group is set up for SpinOlution customers and fans to connect with one another for advice and sales. You can also check to see if there are any storefront dealers in your area. Some shops may have floor models they are willing to sell or point you in the direction of a local customer who may be looking to upgrade and sell their existing wheel. If there are no storefront dealers near you, contacting a dealer who lives near you but operates just online may still be a good recourse to find used wheels. Once you’ve found the used wheel of your choice here are some pointers you may want to consider.
How to 3D Print Your Own SpinOlution Bobbins
in F.A.Q.


FOR PERSONAL USE ONLY. NOT TO BE PRINTED AND RESOLD.
3D printers are an exciting new technology that allows 3 dimensional projects to be created from pre plotted plans. SpinOlution is proud to be able to offer our customers a way to print their own 4 oz bobbins for themselves with a 3D printer. The company will be offering them already printed for sale in the future but wanted to give customers the option to print their own.
To find a 3D printing service you may want to check online both locally in your area or you can use a third party site where you submit your plans and they are shipped to you. An example of one of these sites can be found here.
BENEFITS OF 3D BOBBINS
Lighter Weight on the flyer
More volume for a higher yarn capacity
Plastic bobbins are less durable than wood bobbins
Click the button below to download the plans for the 3D printer and learn more about the construction of the bobbins.
Troubleshooting Firefly Power Issues
in F.A.Q.


The Firefly Spinning wheel is the very popular electric model in the SpinOlution family. Customers love the Firefly because its modular head design allows you to create yarn from thin to chunky with a smooth electric uptake that requires no foot treadle.
During the life of your Firefly if you happen to have any electrical problems these tips may help. If you require further assistance please contact your dealer or customer service.
Charging the Battery
Plug the charger into the jack on the front of the base, and into an outlet. The light on the plug will turn green when fully charged.
Resetting the Fuse
Press the red button on the back of the Firefly to reset the fuse. If you still have power issues, plug in your Firefly to make sure it is charged and contact your dealer.
Resetting the Fuse in an older model
Keep fuses in your kit
Charge overnight before a festival
If the box gets rattled around or shaken up, make sure the band is still aligned (doesn't pop off the flyer)
Once a year open the box and make sure all the wires are tight.

Is the SpinOlution Chair a good height for tall spinners?
With the standard orifice height of our full size wheels measuring in at approx 25 inches tall the SpinOlution Studio Chair may be a perfect companion. With every spinner having a different body type and position of spinning comfort the Studio Chair offers 3 inches of height versatility to help you best match your body and wheel. While this versatility and comfort is appreciated it should be noted that you should not be spinning with your hands drafting right next to the orifice hook. By drafting slightly away from the orifice you will have more comfort while spinning.
Tall spinners may find that the options of chair height and supportive yet comfortable seat gives them increased options to spin with their legs more comfortably stretched out. The portability and design of this studio chair should provide hours of extended enjoyment for spinners of all heights but especially taller spinners.
Wheel Model orifice height
Pollywog Orifice height 19.25 inches
Echo Orifice height 25 inches
Bee Orifice height 30 inches
Bullfrog Orifice height 25 inches
Hoppier Orifice height 21 inches
Monarch Orifice height 25 inches
DIMENSIONS of the Studio Chair
15" width (between side rails)
11" Front to back (before the curve begins)
14.5” Lowest height (at the lowest curve point in front)
17” Highest height (at the lowest curve point in front
With the SpinOlution studio chair, you can customize the height to have ergonomic alignment to your orifice for comfortable production and hobby spinning. We recommend a height where your back is straight and your heels rest on the ground when seated.
Mike Pauly designed this chair from the same Baltic Birch as the SpinOlution spinning wheel collection so it matches beautifully in your fiber arts studio. It can be ordered with or without the heart shape in the front of the seat.
A carrying handle on the back of the chair makes it easy to transport after assembly.

Plying from the Bullfrog Lazy Kate
The Spinolution Bullfrog has a wonderful list of built in features including a built-in lazy kate. The lazy kate is located on the top of the spinning wheel. First you will take the three metal pegs from the slot on the side of the wheel where they are stored and then place them in the holes across the top of the wheel. You can now use these pegs to place your bobbins when they are not in use or to ply from when you are done spinning your singles. The built in lazy kate as well as the option to switch between 8 oz and 16 oz bobbins as well as folding capabilities makes the SpinOlution Bullfrog a versatile and powerful wheel.
Tips for plying from the top
Place Bobbins with the plastic white ring pointing down for better spinning
Place the bobbins with the two singles on the left two rods bringing the yarn behind the right peg
Keep singles pulled out to the right while plying to avoid the drive band and flyer pegs.
Keep a smooth treading speed and motion.
These tips are great for all of our SpinOlution Wheels that have a tip lazy kate.